Use of Heat and Cold in Injury management
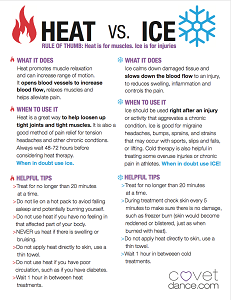
 The use of heat and cold is often not well understood so when I came across this useful summary I wanted to share it.
The aim of cold treatment is to reduce the inflammation and the formation of scar tissue which is inelastic and difficult to deal with afterwards. Scar tissue forms when blood flows to a damaged area and is a result of the quick repair process for stopping the bleeding. The ice works to cool the tissue which restricts blood flow to those areas.
However – and this is often the issue with DIY Ice treatments – if the area becomes too chilled, the blood flow will INCREASE to warm up the area and prevent tissue damage, so you need to tread a fine line.
I recommend that the ice timings be shorter than those shown here and dependant on the size and thickness of the muscles where you use it. So 15 minutes might be fine on the back or on large quads or glutes, 10 minutes on arms and just 5 minutes for hands, wrists, feet and ankles.
As a rule of thumb, ice the area until it feels cold like something from the fridge but not white or pink – that’s too cold – and wrap the cold pack in a dry tea towel or t-shirt to prevent burning the skin.
Use ice as a cycle of on and off. For example ice for 10 minutes, off for 10-15 minutes – this is one cycle. Do this for 3 or 4 cycles then let the area rest and warm up fully.
Remember, cold makes muscles shorten and become inelastic, so the cold tissues will be vulnerable to further damage from stretching or even moving.
Use ice for the first 24-48 hours, depending on the severity of the problem, then use GENTLE stretching and heat to soften the muscles and begin lengthening them slowly. This is a tricky process to get right and depends on the area damaged, how damaged it is and the need for movement etc., so give me a call and I’ll give you further guidance on how to do this.


